 Loading... Please wait...
Sign up for our newsletter
Please note we're currently out of production. If we get enough interest, we may do a crowd sale supported run in the future. Let us know if you're interested!
You can also follow us on twitter.
You can also follow us on twitter.
Our Newsletter
How to Configure VMeter to be a VU Meter in Ableton Live
First part of video shows VMeter configured as VMeter, bouncing with the drum track.
The lights on the VMeter (both column height and brightness) can be controlled by MIDI, so all we need to do is find a way to send out MIDI controller messages based on the track volume.
Luckily, threre's a great set of MIDI VST plugins, including just what we need, called PizMIDI. The VST we're after is midiAudioToCC, which sends out CC messages based on the peaks in the audio. And you can even adjust the inertia (kinda like decay time) to make even extremely short blips show.
- Download the plugin pack from their google code link for your operating system, and extract the zip. Note, we had some problems with the OS X version, and had to get an updated version discussed on a KVR forum thread.
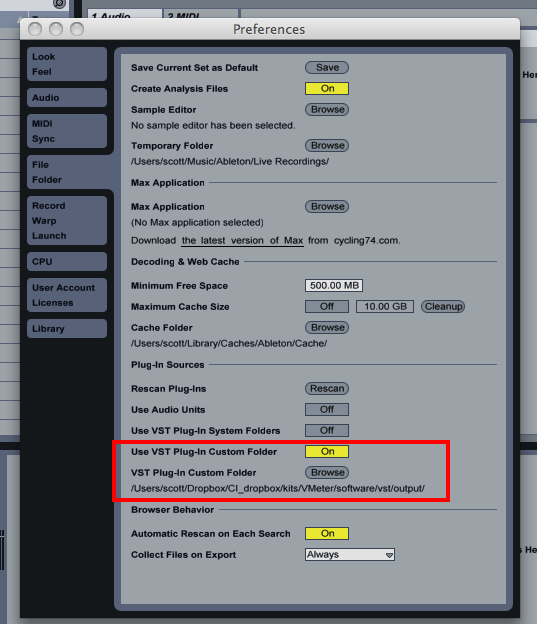
- Now we need to setup Live to load the plugins. Open up preferences, and go to the "File Folder" section. You can either copy the VST into your VST system folder, or specify a new folder. We're going to specify a new folder.

- First click Browse, and select the folder where your unzipped VST(s) live. Then be sure to turn ON the "Use VST Plug-In Custom Folder" option.
- Finally, click Rescan to force Live to search for new plugins that may not have been there when the program started.
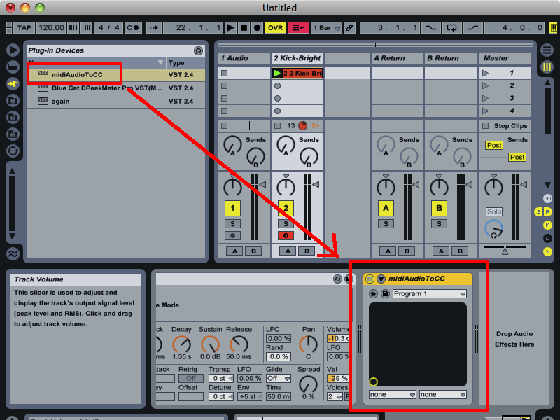
- Now exit out of the preferences, and go to the plugin list by clicking the plug in the far left menu.

- Now that the plugin is loaded, either choose a track you want to monitor or create a simple drum pattern to test it out. Drag the plugin to the end of the effects chain for the track.
 ,
, - The plugin takes audio input, and outputs MIDI data. Unfortunately, there's no way to direct that MIDI output straight to the VMeter. We need to make another MIDI track to do this.
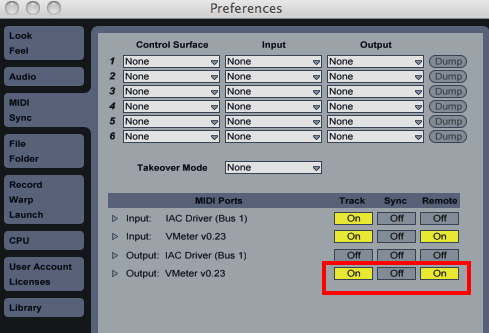
- But before that, go back into the MIDI section of the preferences and make sure the VMeter is setup to accept MIDI output from Live.

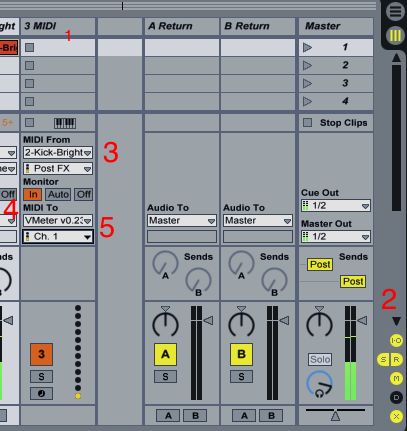
- Now exit the preferences, and add another MIDI track that we'll use to take MIDI from the VST plugin, and route it out to the VMeter.

- First insert a new MIDI track, then open up the IO section (#2), then select the source as the track with the VST plugin, then enable monitoring by enabling IN (orange). Finally, select the VMeter as the output destrination under the "MIDI To" menu. You should see yellow lights moving in the mini-meters.
- You can also check to make sure MIDI is actually being sent out by looking for an orange light in the upper right next to the CPU usage meter. That's the MIDI out light.

- If the orange light is on, that means we're sending MIDI out to the VMeter, but it might just be on the wrong controller number for how the VMeter is setup. By default, the VMeter's LEDs respond to controller number 20.
- Go back to the midiAudioToCC VST plugin, and click the arrow to expand the settings.


- Change the CC Out L to number 20 (the up arrow is nice for this). You might also want to increase the Input gain and the Inertia to make the light brighter and stay on longer.
- You should now see the lights on the VMeter bouncing with the music!

