 Loading... Please wait...
Sign up for our newsletter
You can also follow us on twitter.
Our Newsletter
Instructions and Software Download:
note: These instructions only apply to v.22+ firmware, which is native USB MIDI. If you have older firmware, see the old firmware (USB HID) instructions and software or upgrade your firmware. The latest firmware is 1.31.
Did you know? The VMeter is completely opensource! While we're currently out of production, feel free to make your own, modify, or integrate the design into another idea.
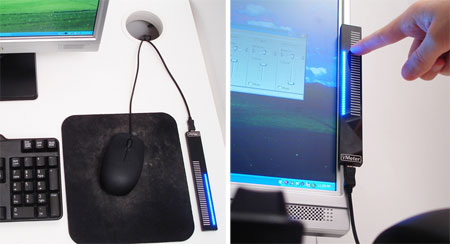
Out the box, the VMeter will immediately work as a ribbon controller for any music software that supports MIDI on Windows, Mac or Linux. The config utility below is only there to change and store settings (like midi channel). While it's based on a max/msp patch (requires free Max Runtime), no patching is required, just a few sliders to change settings. After you store the settings, the config utility and the free MaxMSP RT don't need to run.
note: On Windows, you may have to plug in the device before launching your music software, and it may show up as "USB Audio Device" instead of "VMeter v0.xx".
The default settings have only one controller output active (touch position) via MIDI channel 1, and controller 20. You can turn on many more outputs, like note on/off, pressure, pitch wheel and more by configuring the VMeter.
Check out the tutorials for example setups and software specific instructions.
System Volume Control for Windows XP, 7 and OS X (currently in beta).

With the following software, you can control and display your computer's volume. This isn't needed if you just want to use the VMeter as a controller for music software.
NEW: On Vista+, the VMeter acts as a realtime VU Meter to monitor sound levels, or a cpu usage meter. Video demo.
Downloads: OS X Installer* | Windows Installer
*on OS X 10.8+, you will need to disable GateKeeper temporarily to install until we release through the App Store.
Configuring:
The midi channel, controller numbers, types of outputs and much more can all be changed.
All of the settings are changeable via MIDI controller messages (see full protocol below), but there's also a configuration utility to make this easy.
You'll need:
- Max/MSP runtime engine (look on the right side).
- VMeter_config_utility note: Be sure to right click and choose "Save link as..." (or on mac, ctrl click). Make sure the downloaded file has a .maxpat extension, and not .txt.
For older firmware:
- MAC (10.3+): VMeter_config_util_MAC_9-21-11.zip (use the runtime engine above)
- Windows (XP thru 7): VMeter_Config_Util_Win_9-21-11.zip (use the runtime engine above)
- Max/MSP Source: VMeter_config_util_source.maxpat
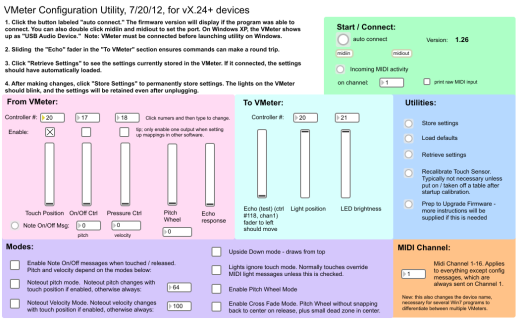
Screen Shot of VMeter Configuration Utility (click to expand):
Instructions are embedded in the utility, see below for details on all the options.
Settings up Controller Mappings:
In Ableton's Live, for example, just engage the MIDI learn mode, select the control you want to affect, and then touch the VMeter.
Tip: Turn off all the outputs with the Config Utility except for the one you want to map. If two outputs are sent at once (touch position & pressure, for instance), the destination application will only be able to map one of them.
MIDI Protocol:
The following list default controller numbers, although all can be changed except for the echo controller number. All the messages are sent over the selected MIDI channel, except for the echo, which is always on channel 1.
- OUTPUT:
- Touch position: Ctrl #20.
- On / Off: Ctrl #17. 127 is sent when VMeter is first touched, 0 is sent when released. Disabled by default.
- Pressure: Ctrl #18. Pressure output is actually more a measure of contact area; two fingers lightly touching will be the same as one heavy touch. Disabled by default.
- Echo test: Ctrl #118. Only chan 1. Values sent to this controller are echoed back.
- Pitch Wheel: Disabled by default, when enabled, it overrides the Touch Position output and LED Column Height input. The pitch wheel acts like a spring-loaded keyboard pitch wheel. When a finger is released, the output snaps back to the center.
- Cross Fader: Pitch Wheel output without snapping back to center.
- Noteout: When touched, NoteOn messages sent via default pitch 64 and velocity 100 (changeable). Disabled by default. NoteOff message sent on release. Both the pitch and velocity can also be mapped to the position of touch, see Noteout Pitch and Velocity modes below.
- INPUT:
- LED Column Height: Ctrl #20
- LED Brightness: Ctrl #21 (17 unique levels including all the way off).
- Echo response: Ctrl #118. Only chan 1.
- Pitch Wheel for Pitch Wheel or Cross Fader mode.
- Note On: The note number (0-127) turns on a column of LEDs, note Off turns all LEDs off. Can be used in Sonar to make a visual metronome.
- Individual LED control (new):
- note: this probably requires programming (no support in typical DAW music programs) and uses the MIDI channel as part of the address.
- Control uses the polyphonic aftertouch command on channels 14, 15 and 16.
- LEDs 1-7: Polyphonic aftertouch on chan 14 (0xAD), data1 bits 0-6.
- LEDs 8-14: status 0xAD, data2 bits 0-6.
- LEDs 15-21: status 0xAE (polyphonic aftertouch on chan 15), data1 bits 0-6.
- LEDs 22-28: status 0xAE, data2 bits 0-6.
- LEDs 29-35: status 0xAF, data1 bits 0-6.
- LEDs 36-38: status 0xAF, data2 bits 0-2.
- Examples and tutorial (example python code and max/msp patches) (coming soon!).
Changing Settings: (always on MIDI chan 1):
- Upgrade Firmware: Ctrl #119, 127. More instructions to be provided.
- Upside-down mode: Ctrl #119. 126 sets normal mode, 125 sets upside-down mode. The LED column is drawn from the top rather than the bottom. MIDI controller outputs are also referenced from the bottom. Useful if you want all the USB cables to go away from you rather than towards.
- Recalibrate Touch Sensor: Ctrl #119. 112 issues a recalibration, which normally shouldn’t be necessary, but might if the environment changes too much, or it gets in an erroneous state. For instance, moving it next to a large metal object can sometimes cause this. In general, the VMeter is contantly recalibrating itself to the environment, and this shouldn't be necessary.
- Enable Touch Position Output: Ctrl #119. 124 enables position output, 123 disables it (useful when setting up mappings).
- Enable Pressure Output: Ctrl #119. 122 enables pressure output, 121 disables.
- Enable On/Off Output: Ctrl #119. 120 enables output, 119 disables.
- Enable Note On/Off Messages: Ctrl #119. 117 Enable, 116 to disable.
- Enable Pitch Wheel Mode: Ctrl #119. 115 enable, 114 disable. This overrides the lights.
- Enable Cross Fader Mode: Ctrl #119. 105 enable, 104 disable. Pitch wheel output without snapping back to center. Overrides lights.
- Read Current Settings: Ctrl #119. 113. Used to update the configuration utility interface.
- Noteout Velocity Mode: Ctrl #119. 111 sets velocity of note-outs based on position. 110 uses preset velocity. Default.
- Noteout Pitch Mode: Ctrl #119. 109 bases the pitch on position. 108 sets it to use preset pitch. Default.
- Lights Ignore Touch: Ctrl #119. 107 causes the VMeter LEDs to NOT respond to touch, 106 turns back on normal touch response. MIDI commands will still be sent. This could be used if you don’t want the LED pattern being controlled by MIDI to be overridden by touch.
- Get Version: Ctrl #119. 103 returns the 4 digit version as ascii via controller number 109.
- Store Settings: Ctrl #119. 118 stores the following so that they will be retained after power is removed.
- upside-down mode
- enable touch position output
- enable pressure output
- enable on/off output
- midi channel
- position output controller #
- on/off output controller #
- pressure output controller #
- light input controller #
- brightness input controller #
- enable note-on/off signals
- note pitch
- note pitch mode
- note velocity
- note velocity mode
- pitch wheel enable
- brightness
- leds ignore touch mode
- pitch wheel enable
- cross fade mode enable
- Change MIDI channel: Ctrl #117. 1-16. Changes the channel over which the above Output and Input messages are sent. Note, all config changes are always sent over chan 1.
- Change Position Output Ctrl Num: Ctrl #116. 0-100.
- Change On/Off Output Ctrl Num: Ctrl #115. 0-100.
- Change Pressure Output Ctrl Num: Ctrl #114. 0-100.
- Change Light Input Ctrl Num: Ctrl #113 0-100.
- Change Brightness Input Ctrl Num: Ctrl #112. 0-100.
- Change Noteout Number: Ctrl #111. 0-127.
- Change Noteout Velocity: Ctrl #110. 0-127.
Known Issues:
- Sensitivity: The VMeter is constantly adjusting to changes in its surroundings, but some extreme changes can cause instability. If the LEDs are moving when you're not touching it, the VMeter may think that it's constantly being touched. Simply unplugging and replugging, or issuing the recalibration command will allow it to work again.
- No output in Windows: In windows, especially XP, the VMeter needs to be plugged in before the destination music software is launched.
- Extremely Slow Response of Lights to Touch: On some operating systems, notably Windows XP, before the final music application is launched, the operating system won't reply quickly to USB MIDI messages. This causes the lights to respond extremely slowly. As soon as the music software selects VMeter is a MIDI source, everything should respond quickly. This is a problem with the OS, and applies to all MIDI controllers.
- Confusion between multiple VMeters in Win 7: In Win 7, some software applications have trouble differentiating between multiple VMeters. For instance, you'll only see one listed. The latest version of the firmware (0.26 or 1.26) addresses by changing the actual device name when you change the MIDI channel.


