 Loading... Please wait...
Sign up for our newsletter
You can also follow us on twitter.
Our Newsletter
VMeter Windows (XP, Vista, 7) Manual
8/23/11 - for version .95 of the Windows software
vmeter.net for more help, support@vmeter.net for direct support
General description: The VMeter can be used to send and receive MIDI controller messages, and also used to control and display your computer’s volume. It’s still in beta, so please let us know about bugs or other cool features you’d like: support@VMeter.net
Software Installation: Download the Windows software from VMeter.net/instructions and open run the installer. ALSO: On Windows, you’ll need some “virtual MIDI cables,” which connect the VMeter software to other music software. We recommend CooperLan's music connection system, which has an additional benefit of being able to route over networks!
**Configure the CooperLan Virtual MIDI cables BEFORE opening the VMeter or other music software**
Setting up the Virtual MIDI Cables: After downloading and installing CooperLan’s system, run the CooperLan Manager. We’re going to create 2 virtual MIDI ports, and connect them to each other to enable programs to pass MIDI back and forth by writing out to these virtual ports.
The first screen will ask about a “Missing Ethernet interface.” Click ‘No’ to dismiss this and uncheck the box to keep it from popping up again. Later, you can use the ethernet feature to route MIDI through a local LAN or the internet.
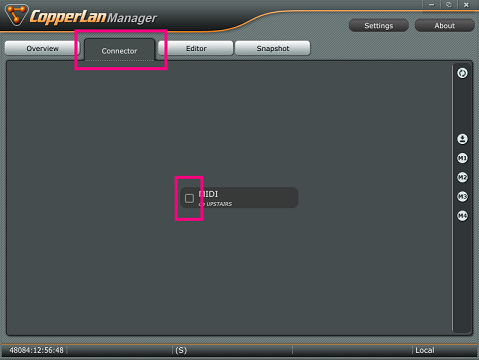
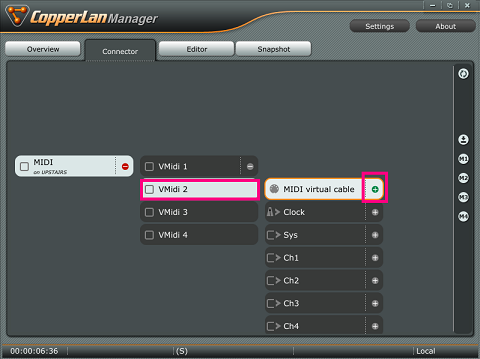
Now select the Connector tab and click on the box next to MIDI.
CooperLan provides 4 virtual MIDI ports (VMidi 1, 2, 3 & 4). We’re going to connect VMidi 1’s input and output together. In the end, this will enable us to send output from one program to VMidi 1 and pick it up from another program.
Click where the pink boxes are to connect the output of VMidi 1 to its input:
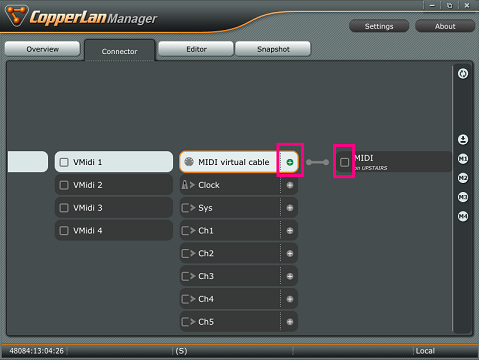
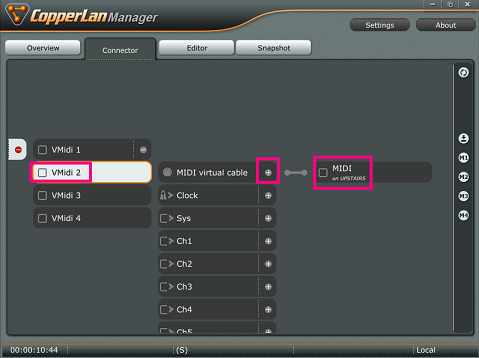
The screen should now look like this:
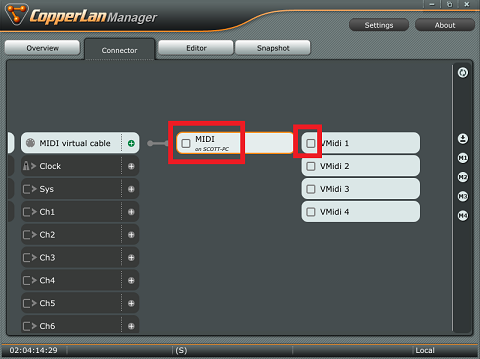
Now do the same thing for VMidi 2:

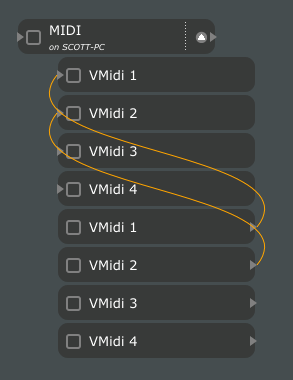
Now if you go back to the overview tab and select the down arrow...

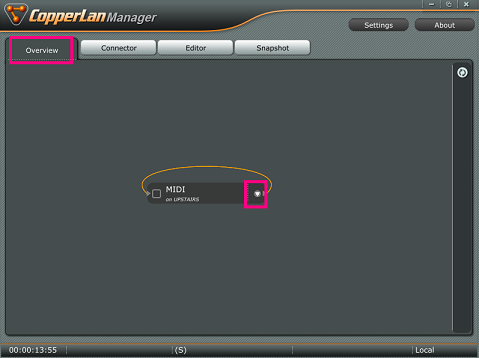
You should see that the output of VMidi 1 goes to the input of VMidi 2, and vice versa.
Getting Started with the VMeter software: Making sure the CooperLan Virtual cable software is already running, startup the VMeter software.
A V icon will appear in the system tray, right or double click it to change the settings.

The VMeter control panel should open.
First, setup the MIDI devices: Click “MIDI Device Routing” from the Edit drop-down menu.
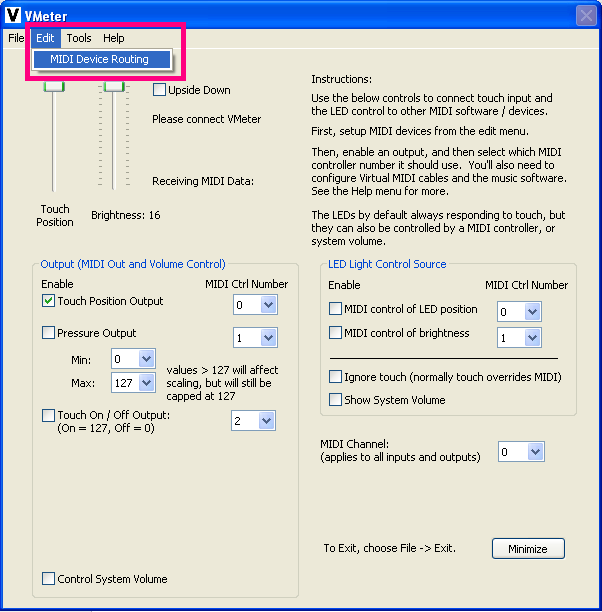
Select VMidi 1 for the output, and VMidi 2 for the input.
Launch the host music software you’d like to control if you haven’t already done so. For demonstration purposes, we’re going to use vmpk, (VirtualMidiPianoKeyboard).
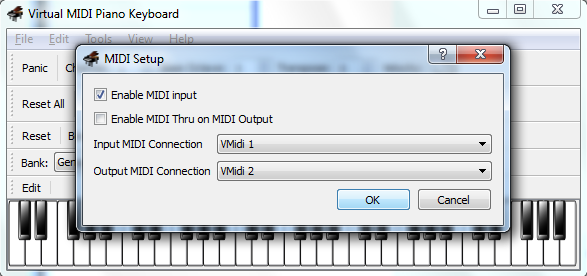
Inside vmpk, edit the connections.

Configure vmpk’s MIDI connections to be the opposite of VMeter’s:
Input: VMidi 1
Output: VMidi 2

Also be sure to check “Enable MIDI input.”
Now we’re going to configure the MIDI controller messages for a quick demo.
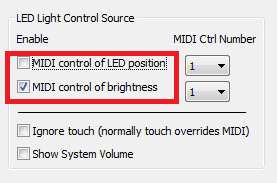
Change the MIDI Ctrl Number to “1” for both the “Touch Position Output” and the “MIDI control of LED position.” Also make sure both of these are checked.
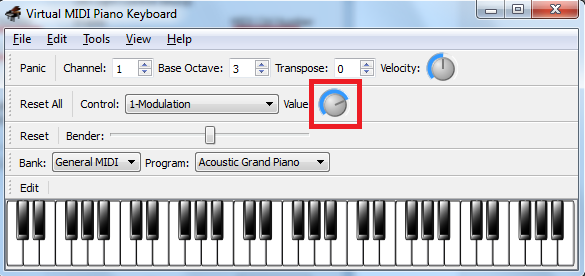
You should now see control wheel below moving in the vmpk software when you touch the VMeter:

If you click and drag that same wheel, you should see the lights on the VMeter move.
Try checking the brightness control box. Now the control wheel in vmpk should change the brightness of the VMeter’s LEDs.
VMeter Control Panel Instructions:
- MIDI Channel: This applies to all input and output. Set this first.
- Output Section:
- Touch Position Output: Touches on the VMeter are mapped from 0 to 127, or inverse if upside down mode is on.
- Pressure Output: This sends MIDI controller messages that are higher for more pressure and lower for less. In actuality, the VMeter senses finger contact area, and not pressure. So two fingers lightly touching would be the same as one finger pressed very hard. By setting the “Max” value higher than 127, it becomes easier to generate higher MIDI values from lighter touches. In other words, a smaller range of pressures can cover the full 0-127 MIDI controller range.
- Touch On / Off: A controller message of 127 is sent on a touch detection, and 0 is sent on a release.
- Control System Volume: If checked, the system volume will respond to the position on the VMeter.
- Light Control Section:
- MIDI Control of LED position: Incoming MIDI messages are mapped to the height of the LED column. Reversed if “upside down” mode is on.
- MIDI Control of brightness: Incoming MIDI messages are mapped to the brightness of the LED column. Only 17 levels are available, from 0 (off) to 16, max brightness.
- Ignore Touch: Sometimes you may want to control a parameter, but not have the lights respond to touches. Normally touches will override any MIDI messages that are controlling the LEDs. This causes touches to be ignored.
- Show System Volume: The LED column will display the system volume. If you just want to have volume control, turn this on in conjunction with the “Control System Volume” option in the output section.
- Upside Down: Check this if you've installed your VMeter with the USB port away from you. This will cause the LEDs to draw from the opposite side, and also "bottom" touches to be interpreted as coming from the top.
- Tools Menu:
- Update Firmware: The firmware on the VMeter itself can be updated. Requires a PC and further instructions. We’ll give further instructions if this is necessary.
- Recalibrate: Sometimes the lights may behave erratically on the VMeter due to sensor confusion on the VMeter. Usually the VMeter will constantly adjust to the environment, but it can occasionally get confused, sometimes if the USB detection process takes too long. This option resets its internal sensors.
Under the hood / how it works: The VMeter is made up of 8 capacitive sensors (like a smart phone display). These sensors are interpolated, filtered and massaged to generate a linear 8bit output to touch position. The raw 0-255 output, all 8 raw sensor outputs, state and other information is available in low level USB HID packets. Also, full control of all 38 LEDs is available. See the open source code for the PC and MAC software for detailed descriptions of the protocol.
Other features we’re working on:
- Multi unit support
- Pitch wheel
- Saving settings
- Dedicated USB MIDI device. You would configure a VMeter with special software, but then it will show up as a dedicated MIDI device, making configuration simpler in other software.
Please send in your suggestions! support at VMeter.net