 Loading... Please wait...
Sign up for our newsletter
Please note we're currently out of production. If we get enough interest, we may do a crowd sale supported run in the future. Let us know if you're interested!
You can also follow us on twitter.
You can also follow us on twitter.
Our Newsletter
Resolume MIDI Mapping Setup Tutorial for Multiple VMeters
This tutorial will walk through setting up two VMeters (v0.24) with resolume VJ software ver 4.01. Note: there were some MIDI bugs in resolume version 4.0 that affected multiple VMeters; please install the latest version.
This tutorial will also use Windows XP. On XP, VMeters show up as "USB Audio Device", and not "VMeter." On Vista or a mac, their names should be correct.
Limitations with resolume:
- Some programs seem to have difficulty discriminating between multiple VMeters on Windows 7, Resolume included. The latest firmware version changes the USB device name when you change the channel. Be sure to get the latest config utility, also.
- Output back to the VMeter's LEDs appears to be limited to 127 or 0, and not values in between
- Pitch bend and Cross Fader modes are not supported
Tutorial:
- To start off, we'll setup one VMeter (we'll call it B) to work on channel 2.
- Plug only VMeter B in, launch the max runtime program, and then open the configuration utility. See the main instructions page for more details.
- First click the auto connect, then change the MIDI channel, and finally store the settings permanently in the VMeter.
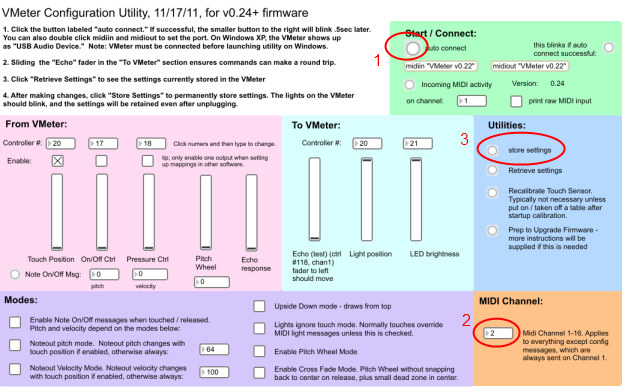
- Now quit Max completely, and plug in the other VMeter (we'll call it A).
- Launch resolume.
- Select Avenue --> Preferences from the top menu, and then go into the MIDI pannel.
- Setup your two VMeters as inputs as shown below. Note that the output doesn't seem to work with this version of resolume. It outputs only 0 or 127, but not in between values, so the VMeter LEDs won't be able to track mouse or automation changes. We're pursuing solutions to this in resolume's forum.
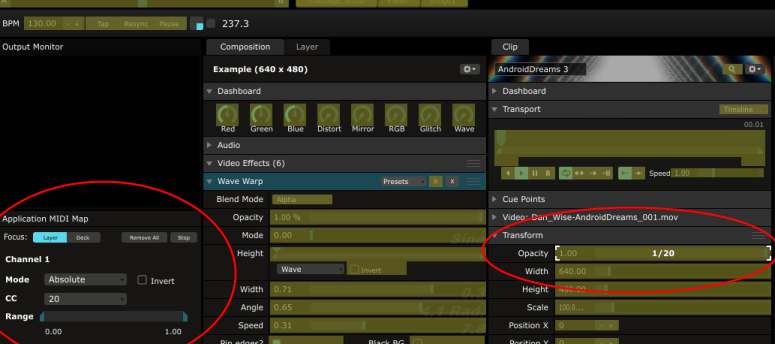
- Exit out of preferences, and select the MIDI mapping mode. From the top menus, selection Mapping --> Edit Application MIDI Map. You can also choose Edit Composition MIDI Map if you want the settings to be stored with the current composition.
- Click on a yellow box to prep it, and then touch a VMeter. You should see the channel and controller number pop up on the control, and more parameter controls show up on the bottom left of the screen.
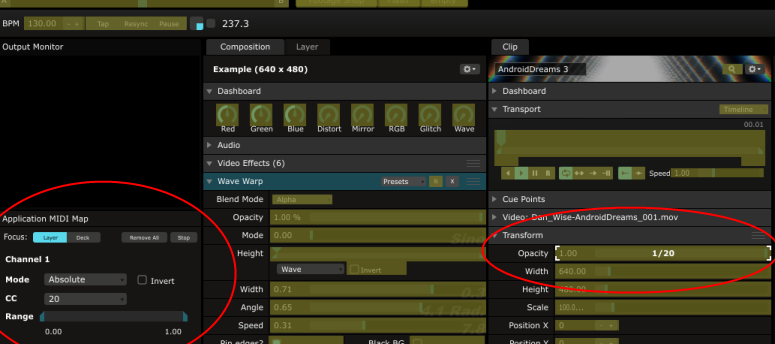
- Now repeat the process with the other VMeter and another parameter. We're going to do this with the "Height" parameter of the clip.
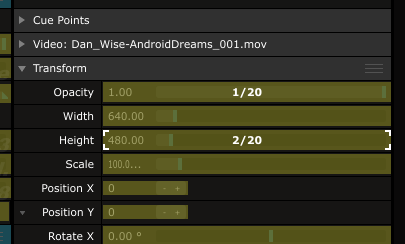
- Tip: you may want to change the input range. In the case of the height parameter, at full range, only the first cm of the VMeter causes the image to go off the screen. By shrinking the range as shown below, we can get much more resolution on the beginning of the stretch.
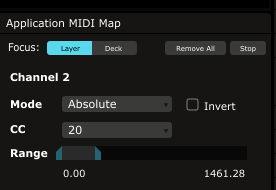
- When you're done setting up the mapping, click the Stop button location in the above "Application MIDI Map" panel.
- Tip: try configuring the VMeter to also output a Note message. By mapping the note message to the play / pause buttons, you can trigger a clip to start playing only when you touch a VMeter.

