 Loading... Please wait...
Sign up for our newsletter
You can also follow us on twitter.
Our Newsletter
Setting up MIDI Controllers in Logic Pro (Volume, Pan, Plugins)
This tutorial will explain how to setup 2 VMeters to control the volume on 2 tracks, and also how to configure the pressure output on one of the VMeters to control a wah-wah plug effect.
Unfortunately, Logic Pro does not send MIDI controller data back out for generic MIDI devices like the VMeter. This means you will not see the LEDs change on the VMeter when you playback automation tracks. Logic Pro does support full bi-directional control for controllers that emulate a Mackie Control Surface, and we're working to find / write software to bridge this gap. One promising option for this is http://www.opuslocus.com/lcxmu/index.php, but we haven't tested it yet, and it's not free.
Controlling Track 1 & 2 Volume with 2 VMeters
Logic Pro is able to distinguish between multiple VMeters, even if all the settings are identical, so there's no need to do anything special with the VMeter configuration.
You do need to make sure each VMeter only has ONE controller output enabled. For instance, make sure you don't have Touch Position output enabled as well as Pressure or Pitch Bend enabled.
- Connect both VMeters (we'll call them A & B).
- Launch Logic Pro
- Create two tracks (1 & 2).
- Assign the Touch Position of VMeter A to track 1's volume.
- Open the "Controller Assignments" window by pressing Command-k
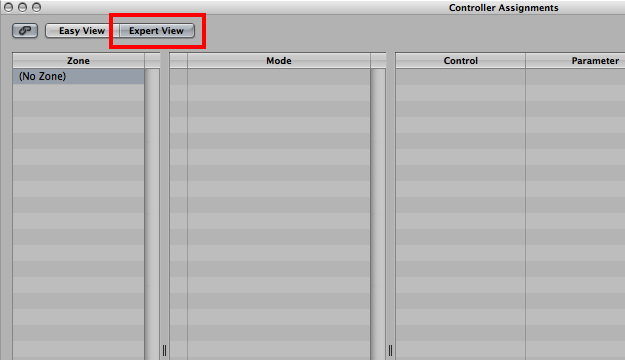
- Select Expert View
- Now, using the mouse, move the control you'd like to map first. In our case, move the volume on the fader for Track 1.
- Press Command-2 to bring up the Mixer.
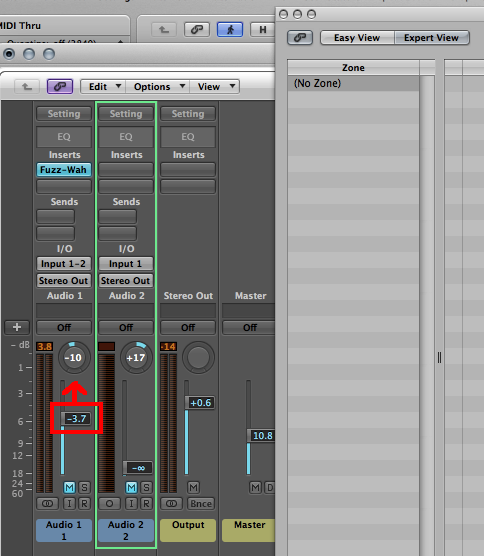
- Press Command-L to start Learn Mode, or press the Learn button in the lower right of the Controller Assignments window.
- Now touch VMeter A. The Controller Assignments window should detect this and look something like the following:
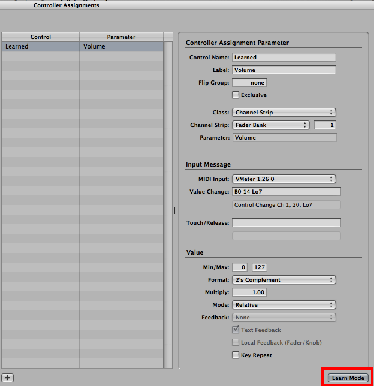
- Before you do anything else, press Command-L again or click the "Learn Mode" button in the bottom right to disable detection. Otherwise any changes we make manually could be overridden.
- Now make the following change the parameters:
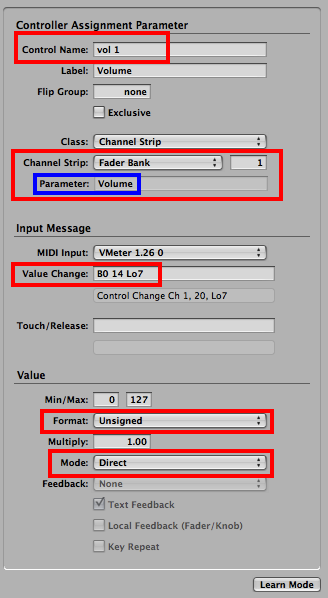
- Change the Control Name to vol 1 so you can identify the parameter in the control list (optional).
- Make sure Channel Strip says "Fader Bank". Change it if it says something else like "Selected Track". (You may actually want Selected Track in the future).
- Make sure "Parameter" says "Volume." If it's blank, you'll need to repeat this procedure because this setting is made by first adjusting a parameter, and then pressing Command-L or "Learn Mode".
- Make sure "Value Change" looks similar to B0 14 Lo7. If you're using a controller number other than 20 on channel 1, these may be different. Just make sure the 3rd word is "Lo7." If it's not, Logic detected a single button rather than a slider. Just change it to Lo7 manually.
- Change "Format" to "Unsigned".
- Change "Mode" to "Direct".
- You should now be able to touch VMeter A to change the volume on Track 1.
- Note: in our setup, the handle on the fader doesn't move, but the volume is indeed being changed, as you can see the number is +6.0, even though the handle is at the bottom.

- Now repeat the procedure for VMeter B and Track 2.
- In summary:
- Move the fader for Track 2 with the mouse.
- Press Command-L to go into Learn mode.
- Slide VMeter B.
- Immediately press Command-L again to exit Learn mode.
- Adjust the parameters in the expert view of the Controller Assignments page (command-k).
Control Two Parameters with One VMeter
- Unplug VMeter B, so only A is connected.
- Launch the Max/MSP config utility. (Launch the Max Runtime engine, and then open the config utility, available at our instructions page.
- Click "Auto Connect", and make sure the firmware version displays.

- Now turn off the Touch Output and enable the Pressure Output.

- You should be able to leave MaxMSP running.
- Switch back to Logic Pro.
- Select Track 1 and add an effect like Fuzz-Wah.

- Double click on Fuzz-Wah to open it's preferences.
- Move the Pedal slider to Logic knows what we're trying to map.

- Press Command-L to enable Learn mode.
- Now touch VMeter A
- Open the Controller Assignments window (Command-k) again to make sure it detected the VMeter touch.
- Press Command-L again to disable Learn mode.
- Repeat the changes shown above (Format = Unsigned, Mode = Direct).
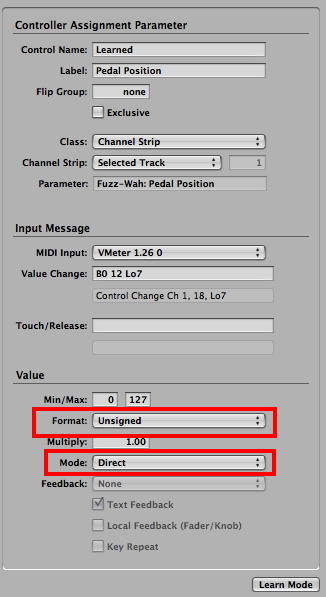
- Go back into the Fuzz-Wah effect and make sure that pressure changes on the VMeter change the pedal position.
- Finally, go back into the MaxMSP config utility and re-enable the Touch Position output.
- Click the "Store Settings" button to ensure the settings are retained if the VMeter is unplugged.
- Make sure you control the Track Volume with touch position and the Fuzz-Wah with pressure.

