 Loading... Please wait...
Sign up for our newsletter
You can also follow us on twitter.
Our Newsletter
Upgrading Firmware (old)
Note: these are the old instruction, see the latest ones here.
We'll hopefully have an easier tool for upgrading in the future, but for now you'll need to install some additional software. You'll also need to follow the right instructions for the hardware version of the VMeter that you have. There are two versions out now (the newer is functionally equivalent, but has some different electronics that make manufacturing more affordable).
First, determine which version of the hardware you have:

Differences
- If you bought your VMeter in 2011, you have version A.
- Version A is shorter: .32" or 8mm vs Version B, which is .375" or 9.5mm tall.
- The bottom piece of acrylic on Version A is thinner than the middle.
- The firmware numbers on version A all have a 0 in the first digit: 0.xx. Version B firmware starts with 1, like 1.xx. The firmware version should display in the configuration utility after you connect.
- Make sure you have the latest config utility
- Version A: VMeter_0.26_firmware.zip
- Version B: VMeter_1.26_firmware.zip
- Send us an email to request older firmware.
WINDOWS:
- The overall procedure is:
- Put the device in upgrade mode
- Load the EEPROM file, which contains all the default MIDI settings
- Load the main flash file.
- Put the VMeter in Upgrade mode. If you have older firmware, you'll need to get software from our older instructions page. If your firmware is v0.22 or greater, use the new Config Utility.
- Plug in the VMeter (must be plugged in before launching the config util)
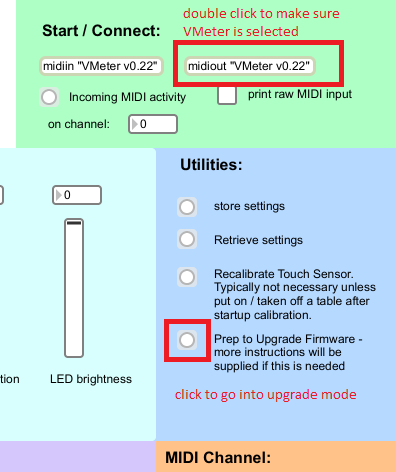
- For newer firmware: use the config utility to put the VMeter into upgrade mode. Select the VMeter as the MIDI output device first. On XP, it will be called "USB Audio Device."
- If you have older firmware, launch the VMeter program and choose Upgrade Firmware from the Tools menu at the top.
- Next, if you have Version A, download and install Flip.
- Otherwise, skip to the Version B Windows section below. Not sure? See version difference pic at top.
- Version A:
- You should hear the USB unplug and plug sound at this point, and the lights should stop responding to touch.
- Now launch the Flip program you installed earlier.
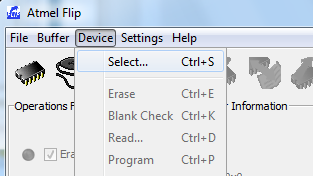
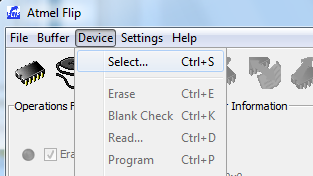
- Choose "Select" from the "Device" menu at the top:
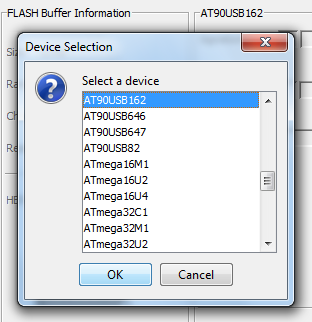
- Select AT90USB162 from the list
- Now choose USB from the Communication menu in the Settings menu:
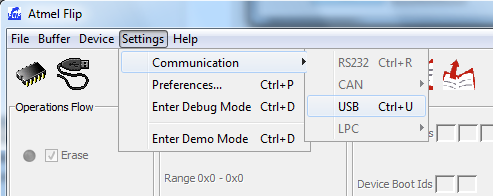
- Choose Open on the next dialog.
- The program should now look like the following. If there was an error, try putting the VMeter in upgrade mode again.
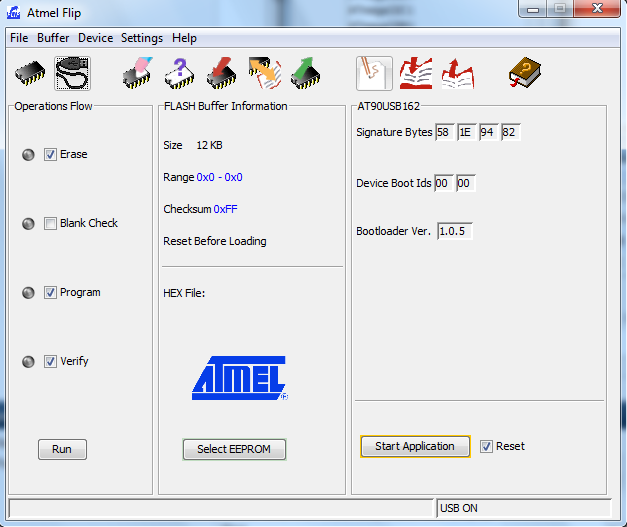
- Click "Erase Target Device Memory" button at the top.

- Now choose File --> Load HEX File and select the eeprom file you received in email: vmeter_0.26_eeprom.eep
- Click "Select EEPROM" in the center column.

- The button should switch to saying "Select FLASH":

- Finally, click run in the bottom left:

- If there were no errors, we're now going to load the main program code.
- Click the "Select Flash" button in the bottom of the center column.

- Go back to File and load the other .hex file: vmeter_0.26_firmware.hex. This is the main program code.
- Once again, click Run.
- Now simply unplug and replug the VMeter and you should see a short light animation. On XP, you may need to unplug and re-plug again after the operating system fully installs the new device.
- Verify that it works by launching the config utility again (make sure the VMeter was plugged in first), and then clicking "Auto Connect." You should see version 0.26 pop up.
- Download and unzip the loader app: hid_bootloader_cli_PC.zip
- Make sure the firmware is in the same directory as the unzipped hid_bootloader_cli.exe. Unzip everything.
- Launch cmd.exe
- On Win 7, click start, then type cmd.exe in the search box
- On XP, click start, then run, then type cmd.exe
- Navigate to the directory where all your downloads are, and make sure the firmware and hid_bootloader_cli app are unzipped.
- An easy way to do this is to navigate to the folder using internet explorer and then copy the file directory.

- Go back to the cmd.exe window, type "cd " (no quotes, and make sure there's a space after "d".
- Right click in the window, and choose paste.
- Hit enter and you should be in the right directory.
- Assuming your VMeter is already in upgrade mode (see above), copy and paste the following into the command window. This will load a settings file and then the actual firmware.
- hid_bootloader_cli.exe -mmcu=at90usb162 -v vmeter_v1.26_eeprom.eep
- Wait for the program to load, and then another 10 seconds while the device disconnects and reconnects.
- Now copy and paste the following line:
- hid_bootloader_cli.exe -mmcu=at90usb162 -v vmeter_v1.26_firmware.hex
- After it finishes, unplug, and replug the VMeter.
- Start up the config utility and click "Auto Connect." The displayed version should be 1.26. (make sure the utility was completely closed before you plugged in the VMeter).
- Please email us if you have any questions!
MAC Instructions:
The overall steps are as follows:
- Download and install necessary tools
- Set the VMeter in upgrade mode
- Load eeprom settings file
- Load firmware file
If you have Version B, simply download this file: hid_bootloader_cli_MAC.zip Now skip to setting the VMeter to upgrade mode.
If you have Version A, the upgrade tools are unfortunately are much harder to install, and require XCode, which can be more than 1.5GB.
- Download and install XCode (may require sign-up): http://developer.apple.com/xcode/
- note: you don't need X11 if that options comes up during installation.
- Download and install MacPorts: http://www.macports.org/install.php (the dmg route is easiest)
- Once you've installed MacPorts, open up a terminal window. Use the find tool in OS X (hit Command-Spacebar or click the magnifying glass in the upper right) to quickly locate terminal by simply typing "terminal" in the search.
- Now type the following to automatically install the programmer along with any necessary dependencies:
- sudo /opt/local/bin/port install dfu-programmer
- (it may ask for your admin password)
- Now make sure the VMeter is plugged in. If you've got an older version (earlier than v0.22), you'll need the old software. If it's v0.22 or later, the new config utility must be used.
- If you have older firmware (v0.22), launch the VMeter software, click the V in the status bar to open the config page,

- and then choose "Upgrade Firmware" from the "Tools" drop down menu.

- If you have newer firmware, launch the VMeter Configuration Utility.
- After making sure you're connected to the VMeter (click "Auto Connect"), select "Prep to Upgrade Firmware":

- Now go back to the terminal and move to the directory with the new firmware files. Unzip them if you haven't already done so. Also unzip the hid_bootloader_cli_MAC.zip file, too.
- An easy way to navigate in the terminal is to find the files in Finder first, then type "cd " in terminal, and then drag the folder icon at the top of the Finder window into the terminal.
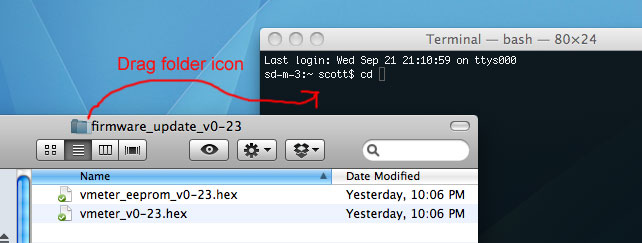
- Now type the following exactly in the terminal, hitting enter after each line and making sure there are no errors.
- dfu-programmer at90usb162 erase
- dfu-programmer at90usb162 flash-eeprom vmeter_0.26_eeprom.hex
- dfu-programmer at90usb162 flash vmeter_0.26_firmware.hex
- Now unplug and replug in the VMeter. You should see a short light animation immediately.
- Confirm the upgrade was successful (see below next section)
- Make sure the upgrade program (hid_bootloader_cli) is also in this same directory with the firmware files. Make sure everything is unzipped.
- Assuming the VMeter is already in upgrade mode, copy and paste the following:
- ./hid_bootloader_cli -mmcu=at90usb162 -v vmeter_v1.26_eeprom.eep
- Wait for the program to load, and then another 10 seconds while the device disconnects and reconnects.
- Unplug and Replug the VMeter. You should see an every-other pattern on the LEDs.
- Now copy and paste the following line:
- ./hid_bootloader_cli -mmcu=at90usb162 -v vmeter_v1.26_firmware.hex
- Unplug and replug in the VMeter. You should see a short light animation immediately.
- Follow the steps to below to confirm that everything worked.
- Connect the VMeter first, THEN start up the config utility and click "Auto Connect." You may need to close and restart the config utility if it was already opened when you connected the VMeter. The displayed version should be 0.26 or 1.26.
- Note that some programs retain the device name even after the firmware changes, so you may still see an earlier version in many applications. To update the name:
- Unplug the VMeter
- Open "Audio MIDI Setup"
- Click the Search magnifying glass in the upper right
- type Audio MIDI Setup
- Choose Audio MIDI Setup
- Select "Window" from the drop down menus at the top
- Choose "MIDI Studio"
- Click the VMeter icon
- Click "remove device"
- Plug the VMeter back in
- You should see the VMeter back again with its new name

